2024.02.06
UltraleapハンドトラッキングをRaspberry Pi 4とPythonで動かしてみる
WEBマガジン非接触
目次:
-
- 1. はじめに
- 2. Ultraleap Raspberry Pi®用SDK「Gemini」環境設定
- 3. 「Gemini」 のインストール手順
- 4. Python™環境でハンドトラッキングを実現する Python-bindingの設定
- 5. デモプログラムの作成 (Pinchingして音を出力するデモ)
- 6. おわりに
1. はじめに
Ultraleap社では2023年にLeap Motion Controller 2 のリリースと共に、ハンドトラッキング・ソフトである「Gemini」のアップデートが行われました。最新「Gemini」ではサポートするOSの種類も増え、ついにRaspberry Pi用の「Gemini」も公開されました。本稿ではRaspberry Pi用「Gemini」のインストール、Raspberry PiでPythonコードを実行し、簡単なデモプログラムを作成する方法について説明します。
2. Ultraleap Raspberry Pi用SDK「Gemini」環境設定
UltraleapのRaspberry Pi用「Gemini」を使用するためには、下記のようなシステム仕様が要求されます。
- Raspberry Pi OS
- Raspberry Pi 4, 5
- 2 GB RAM
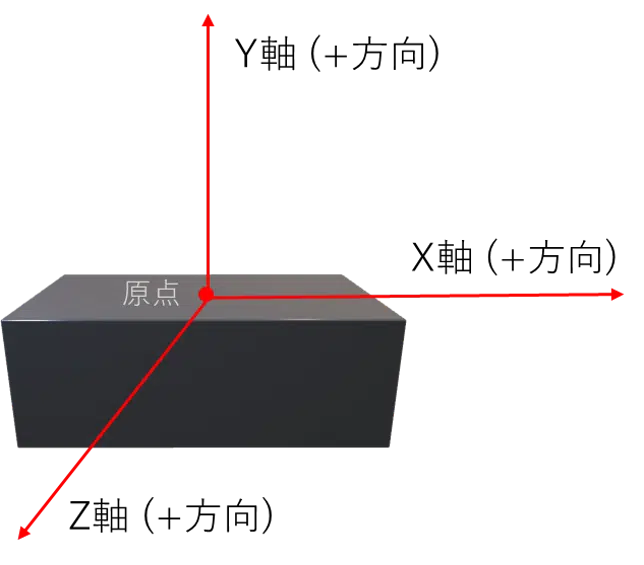
- USB 2.0 ポート又はUSB 3.0 ポート (Leap Motion Controller 2 使用時)
本稿のテスト環境は下記のとおりになります。
- Ubuntu® 22.04
- Raspberry Pi 4 model B
- 4 GB RAM
3.「Gemini」 のインストール手順
3-1) Raspberry Pi SDKをダウンロードします。
Ultraleap社のWEBサイトから「ultraleap-hand-tracking_v5.17.1-2023.11.16_raspberry-pi-os.tar.gz」をダウンロードします。ダウンロードの際にはUltrleap社のWEBサイトにユーザー登録をする必要があります。
▶ダウンロード:https://leap2.ultraleap.com/gemini-downloads/#tab-desktop
ダウンロードした圧縮ファイルを適切なディレクトリで展開します。展開したファイルの中にはC言語ベースのSDK(LeapSDK)とTracking Server起動ファイル(TrackingService)が含まれています。本稿では「/home/user/Leap-p/arm64」のディレクトリを作成し、ファイルを展開します。
3-2)「 Gemini」をインストールする
Terminalを開き、展開したファイルがあるディレクトリで下記のコマンドを入力し、「Gemini」をインストールします。
user@user-desktop:~/Leap-pi/arm64$ sudo ./install_gemini.sh
これで、/opt/ultraleapというディレクトリが生成されました。インストールが終わると同時に 「License Acceptance」に関する内容が表示されます。
A を入力して同意をするとTracking Serverが起動できるようになります。(この段階でTracking Serverはバックグラウンドで起動を開始します。)
※同意をしないと Tracking Server が起動しないのでご注意ください。
※Tracking Serverが動かない場合は(何も表示されずに止まっている)上記のコマンドを入力し再インストールしてください。
3-3) Tracking Service 関連コマンド
#サーバー停止 sudo systemctl stop libtrack_server #サーバー起動 sudo systemctl start libtrack_server #システム起動時にサーバーが自動的に起動するように設定 sudo systemctl enable libtrack_server #Geminiをアンインストール sudo ./uninstall_gemini.sh
4. Python環境でハンドトラッキングを実現する Python-bindingの設定
最新「Gemini」ではPython環境でハンドトラッキングを使用できるPython-Bindingも提供されています。本稿ではRaspberry PiでPython-Bindingを設定し、Pythonでハンドトラッキングのサンプルコードを作成してみます。
4-1) Python binding ファイルをダウンロードする
▶ダウンロード:https://github.com/ultraleap/leapc-python-bindings
※Windows, Mac OSの「Gemini」 5.17.1にも含まれています。
Ultraleap社のgithubからpython-bindingをダウンロードし、展開します。(Code → Download ZIP からダウンロード)本稿では /home/Leap-i/arm64/LeapSDK/samples の中に pyLeap というディレクトリを作成して展開します。
※2024.02.09. 現在、Python bindingに含まれている pre-compiled moduleは「 Gemini」 5.17.1 と下記のPythonバージョンで実行できます。
- Windows®: Python 3.8
- Linux x64: Python 3.8
- Darwin: Python 3.8
- Linux ARM: Python 3.8, 3.9, 3.10, 3.11
4-2) 仮想環境を生成する
まずはハンドトラッキング専用の仮想環境を生成します。本稿では下記のコマンドを使って、「.LeapT」という仮想環境を生成します。
python -m venv .LeapT
仮想環境を有効化します。
source .LeapT/bin/activate
仮想環境を無効化する時は下記のコマンドを入力します。
deactivate
4-3) 必要なライブラリをインストールする
Python-binding を展開したディレクトリ(本稿ではpyLeap)に移動し、ハンドトラッキング起動に必要なライブラリ等をインストールします。
(.LeapT)user@user-desktop:~$ cd Leap-pi/arm64/LeapSDK/samples/pyLeap (.LeapT)user@user-desktop:~Leap-pi/arm64/LeapSDK/samples/pyLeap$ pip install -r requirements.txt (.LeapT)user@user-desktop:~Leap-pi/arm64/LeapSDK/samples/pyLeap$ pip install -e leapc-python-api
4-4) サンプルプログラムを実行する
examples ディレクトリに含まれているサンプルプログラムを下記のコマンドで実行します。
(.LeapT)user@user-desktop:~Leap-pi/arm64/LeapSDK/samples/pyLeap$ python examples/simple_pinching_example.py
※ examples ディレクトリには下記のサンプルがあります。
- print_current_time.py : LeapCにおける時間を出力する単純なプログラムで、Python binding のモジュールが正常に動いているのかを確認できます
- interpolation_example.py : LeapC API の interpolation を用いて、手の位置を決定するプログラム
- multi_device_example.py : 複数のデバイスのトラッキング結果を出力するプログラム
- simple_pinching_example.py : pinch動作を認識して出力するプログラム
- tracking_event_example.py : フレーム毎のpalm positionを出力するプログラム
- visualiser.py : skeleton handが表示される単純なビジュアライザー
5. デモプログラムの作成 (Pinchingして音を出力するデモ)
サンプルプログラムのsimple_pinching_example.pyを改造して、pinching動作が検知されたエリア毎に異なる音を再生するデモを作成します。音の出力のためにpygame ライブラリを使います。
5-1) pygame をインストールする
pygameはpythonでゲームアプリの開発ができるライブラリです。[1] (https://github.com/pygame/pygame) このライブラリを利用して音を再生します。下記のコードでインストールできます。
pip install pygame
Pythonでpygameをimportして使う例は下記のようになります。
*初期化とディスプレイの大きさ、ディスプレイの表題を設定します。
import pygame as pg
pg.init()
width, height = 320, 240
screen = pg.display.set_mode((width, height))
pg.display.set_caption("Pinching Sound")
5-2) pinching動作を認識するコードの構成について
Pinching 動作を認識するサンプルコード[2]を改造する前に、Pinchingを認識するコードの構成を見てみます。Pinchingの認識は次のような順で行われます。
- デバイスの接続を確認し、初期化する
- フレーム毎に手を認識する:左手・右手の判断、親指と人差し指のベクトル取得する
- 取得したベクトルから親指と人差し指の距離(x, y, z 座標)を演算し、しきい値(サンプルコードでは 20)未満の場合は、pinching動作をおこなっていたと判断する。
Ultraleap デバイスを基準とした x, y, z の軸は次のようになります。
def fingers_pinching(thumb: ldt.Vector, index: ldt.Vector): diff = list(map(abs, sub_vectors(thumb, index))) if diff[0] < 20 and diff[1] < 20 and diff[2] < 20: return True, diff else: return False, diff
4-3) 音を出力するコードを作成する
Pinching 動作に合わせてpygameで音を出すコードを追加します。pygameで音の再生は、音のファイルを読み込む、音を再生するチャンネルを設定、チャンネルで音を再生する順で行います。基本的な形式は次のようになります。
import pygame as pg
pg.init()
PinchSound = pg.mixer.Sound("drum.wav")
channel = pg.mixer.Channel(0)
channel.play(PinchSound)
音の再生が終わるまで、設定したチャンネルを使えなくなるため、空いているチャンネルがあれば使用するようにコードを修正します。
import pygame as pg
pg.init()
PinchSound = pg.mixer.Sound("ファイルのパス/drum.mp3")
channel = pg.mixer.find_channel()
if channel:
channel.play(PinchSound)
複数のチャンネルを同時に再生したい時は、複数のチャンネルを用意し、チャンネルのキューに再生する音を入れて、入った順番で再生されるようにします。
import pygame as pg
import time
drum1 = pg.mixer.Sound("sounds/drum1.mp3")
drum2 = pg.mixer.Sound("sounds/drum2.mp3")
pg.init()
channel1 = pg.mixer.Channel(0)
channel2 = pg.mixer.Channel(1)
channel1.queue(drum1)
channel2.queue(drum2)
time.sleep(3)
channel1.queue(drum1)
Ultraleap社作成のサンプルコード [2] を基に、手の認識された位置毎に違う音を再生するように修正したコードは下記のようになります。
実行機能:
- pinching 動作を認識する
- pinching 動作が認識されたら音を出力する
- Pinching の位置(親指の位置)毎に異なる音を再生する
- 4つのチャンネルを用意し、各チャンネル毎に異なる音を再生する
- 出力される音は Window にも表示される
- Q キーを押すとプログラムが終了される
import time
import leap
import sys
from leap import datatypes as ldt
import pygame as pg
pos_x = 0.0
pos_z = 0.0
pinching = False
pg.init()
pgwindow = pg.display.set_mode((300, 150))
font = pg.font.SysFont(None, 50)
#Windowにテキスト出力
def DispText(txt):
text = font.render(txt, True, (255, 255, 255))
pgwindow.blit(text, (40, 30))
#指の位置情報取得
def location_end_of_finger(hand: ldt.Hand, digit_idx: int) -> ldt.Vector:
digit = hand.digits[digit_idx]
return digit.distal.next_joint
#位置情報のマップを作成
def sub_vectors(v1: ldt.Vector, v2: ldt.Vector) -> list:
return map(float.__sub__, v1, v2)
#Pinching動作の判断
def fingers_pinching(thumb: ldt.Vector, index: ldt.Vector):
diff = list(map(abs, sub_vectors(thumb, index)))
if diff[0] < 20 and diff[1] < 20 and diff[2] < 20:
print("pinching!")
return True, diff
else:
return False, diff
#Pinching動作を認識する
class PinchingListener(leap.Listener):
def on_tracking_event(self, event):
global pos_x, pos_z, pinching
if event.tracking_frame_id % 30 == 0:
for hand in event.hands:
thumb = location_end_of_finger(hand, 0)
index = location_end_of_finger(hand, 1)
pinching, array = fingers_pinching(thumb, index)
pos_x = list(thumb)[0]
pos_z = list(thumb)[2]
def main():
global pinching, pos_x, pos_z
drum1 = pg.mixer.Sound("sounds/drum1.mp3")
drum2 = pg.mixer.Sound("sounds/drum2.mp3")
guitar1 = pg.mixer.Sound("sounds/guitar1.mp3")
guitar2 = pg.mixer.Sound("sounds/guitar2.mp3")
listener = PinchingListener()
connection = leap.Connection()
connection.add_listener(listener)
channel1 = pg.mixer.Channel(0)
channel2 = pg.mixer.Channel(1)
channel3 = pg.mixer.Channel(2)
channel4 = pg.mixer.Channel(3)
with connection.open():
while True:
pgwindow.fill((20, 20, 20))
for event in pg.event.get():
if event.type == pg.KEYDOWN:
if event.key == pg.K_q:
print("quit the program")
pg.quit()
sys.exit()
#Pinchingの位置(親指の位置)毎に異なる音を再生する
if pinching:
if pos_x >=0 and pos_z >=0:
channel1.queue(drum1)
DispText("drum1")
elif pos_x <0 and pos_z >=0:
channel2.queue(drum2)
DispText("drum2")
elif pos_x >=0 and pos_z <0:
channel3.queue(guitar1)
DispText("guitar1")
elif pos_x <0 and pos_z <0:
channel4.queue(guitar2)
DispText("guitar2")
pg.display.flip()
if __name__ == "__main__":
main()
6. おわりに
本稿では最近公開されたUltraleap社のRaspberry Pi用SDKとPython-bindingを用いて、手の動作を認識し、音を再生するデモの作成についてご紹介しました。上記のサンプルコードのような動作以外にも、手の位置座標や移動速度、方向などの情報を用いて多様な応用プログラムを作成することができます。Leap MotionはRaspberry Pi 環境で動作できるようになることによって応用分野が広がると期待されています。
参考資料
[1] Pygame : https://www.pygame.org (Accessed 9 Feb. 2024.)
[2] Pinching動作を認識するサンプルコード:https://github.com/ultraleap/leapc-python-bindings/blob/main/examples/simple_pinching_example.py (Accessed 9 Feb. 2024.)
